搭配oat1.6.3的版本v4.6.0
https://github.com/veyon/veyon/releases/tag/v4.6.0
教師端與學生端的版本最好一致
教師端v4.5.0 學生端V4.6.0在示範時會發生學生端畫面閃動的問題
搭配oat1.6.3的版本v4.6.0
https://github.com/veyon/veyon/releases/tag/v4.6.0
教師端與學生端的版本最好一致
教師端v4.5.0 學生端V4.6.0在示範時會發生學生端畫面閃動的問題
參考網址:珩宇老師生活科技
雷射切割機為現在大家實作時非常常用的加工工具,而一般來說我們常用的雷射切割機的款式有兩種類型,一種搭配RDworks,一種則是搭配CorelLaser這個外掛軟體。
CorelLaser要搭配CorelDraw這套付費的向量繪圖軟體
K40 Whisperer 可搭配 6C6879-LASER-M2 控制板(柳營國中用這個機板)
網址:http://www.scorchworks.com/K40whisperer/k40whisperer.html
參考網址:
退役的 pi3 何去何從?
樹莓派智能家居單靠一款Home Assistant就能控制所有品牌的智能設備!如何安裝?【明富其識】
https://www.youtube.com/watch?v=I17bFW0eni0
下載及安裝
https://www.home-assistant.io/installation/raspberrypi
https://ithelp.ithome.com.tw/articles/10218414
https://www.youtube.com/watch?v=Wu2rCB_NCnc
https://github.com/home-assistant/operating-system/releases/tag/10.0
主機的/etc/dnsmasq.conf設定
addn-hosts=/etc/hosts
設定完得service dnsmasq restart
主機的/etc/hosts
120.116.1.10 tn
163.26.179.2 sp
125.228.21.220 sa
ubuntu client端設定
/etc/resolv.conf nameserver 指向dnsmasq主機
nameserver 192.168.1.9
這樣就可以了
windows client端設定
指定ipv4的DNS為192.168.1.9
取消ipv6的選項,ipv6會抓ipv6的DNS
ipconfig /all 查詢DNS的欄位只能有192.168.1.9
只有簡單的網址不接受需要比較複雜的兩段式網址(加個.a吧)
主機的/etc/hosts
120.116.1.10 tn.a
andriod 尚不知如何指定只有一個DNS
sublime支援語言眾多,右下角語言選單落落長,可以少一點嗎?
找到sublime安裝目錄,一般是C:\Program Files\Sublime Text 3\Packages
每個檔案(例如ASP.sublime-package)都是對特定語言的支援
挑不常用到的檔案,直接刪除即可
參考網址:longcaretw.com
參考網址:https://www.kocpc.com.tw/archives/487189
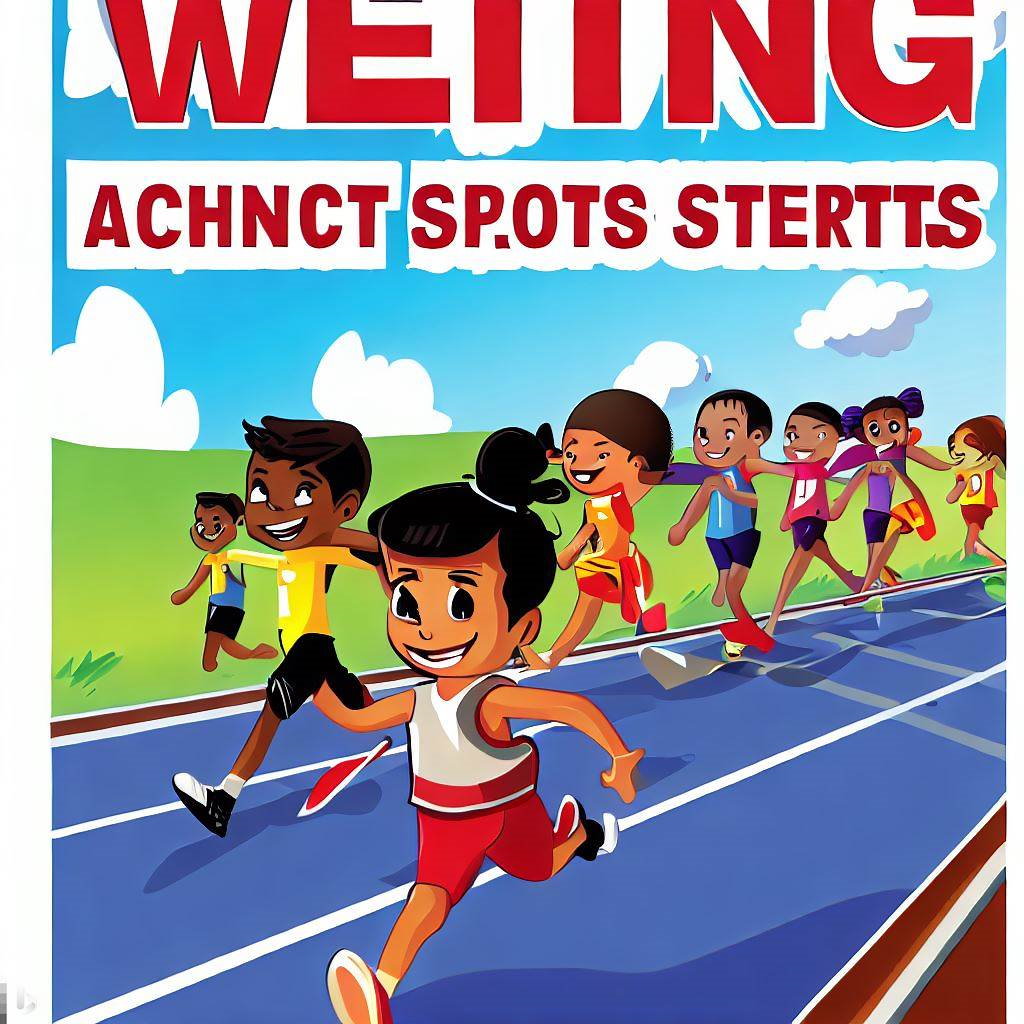
微軟image creator內建在Edge內,可以依要求產生圖檔。
目前還不支援中文的提示,所以就利用google翻譯成英文
下一段需求
A sports meeting poster in A4 vertical format with running track and children, cartoon style,Editable image format, SVG
經過約3分鐘的運算,終於得到4張圖檔。A4直式沒用,它產生的都是1024*1024大小的圖,
Editable image format, SVG也沒用,它也需要保護吧,給你可編輯的圖檔,靠什麼吃飯啊!
基本上圖的品質不錯,只是它可能故意留一些小問題,人物的手都不太正常,好像章魚。
標題的文字也都故意拼錯。
我想這是故意的吧,讓人一看就知道是AI產生的圖。
初始建立帳號給了25個下要求的機會,用完了就得去微軟的Rewards拿點數兌換。